Jun 26, 2026News & Insights
How to Select & Install a Kitchen Faucet: A Buyer-First Specification Guide
Target audience: Homeowners doing a refresh and distributors/importers who need a clear spec framework to sell the right kitchen faucet to the right customer.
1. Why the kitchen faucet matters more than it looks
The kitchen tap is the highest-frequency touchpoint in the house—used dozens of times a day for drinking, cooking, rinsing, and cleaning. A poor choice doesn't just look wrong; it drips, stains, wobbles, or forces you to re-plumb six months later.For importers, the lesson is the same: margin follows reliability. The faucets that generate repeat orders aren't the ones with the flashiest box—they're the ones that survive real kitchens.
2. Quick Spec Checklist Before You Buy (use this when advising customers or shortlisting suppliers)
Spec | What to Look For | Why It Matters |
|---|---|---|
Body Material | Brass (preferred) or certified SUS304 stainless | Brass handles pressure & corrosion best; avoid mystery zinc alloys on price-tier goods |
Valve Cartridge | Ceramic disc, 500,000+ cycle rating | The #1 failure point. Rubber/gland washers belong in the past |
Surface Finish | Chrome (base), PVD matte black / brushed nickel | Ask for salt-spray test data (ASTM B117 / neutral salt spray). Kitchen fumes + cleaners = harsh environment |
Flow Rate / Aerator | ≤ 2.2 gpm / 8.3 L/min with honeycomb aerator | Saves water, softens splash, keeps perceived pressure "full" while using less |
Hose & Pull-Out | SS braided or 1.5 m+ stainless hose, secure docking | Cheap plastic clips = sagging head and leaks in month 6 |
Mount Style | Deck plate (1-hole / 3-hole) or flush deck mount | Match the existing sink cutout before falling in love with a silhouette |
Warranty | Minimum 3 years functional warranty on finish + cartridge | Anything less = you're the warranty department |
Importer note: If you're sourcing for multiple markets, lock your supplier into one cartridge platform across your whole kitchen range. It cuts spare-part SKUs in half and makes after-sales actually manageable.
3. Types of Kitchen Faucets (how to choose by use-case, not just "looks")
3.1 By mounting & hole count
Type | Best For | Watch Out For |
|---|---|---|
Single-handle, 1-hole | Modern minimal sinks, easiest DIY swap | Needs correct deck thickness tolerance |
Two-handle, 3-hole / 8" centerset | Traditional kitchens, clearer hot/cold logic | More seals = more potential drip points if quality is low |
Wall-mounted | Farmhouse / commercial-style sinks | Requires rough-in planning before tile—retrofit is expensive |
3.2 By function
- Standard spout — reliable, cheapest to service
- High-arc (gooseneck) — better for filling stockpots, but needs stronger base stability
- Pull-down / pull-out spray — the volume seller today; look for magnetic docking or positive mechanical lock, not friction-only
- Semi-pro / spring coil — commercial aesthetic; heavier, needs solid brass shank and proper mounting
3.3 Surface & durability reality check
Kitchen environments are brutal: oil vapour, citrus cleaners, abrasive pads.A proper finish spec goes beyond "it's chrome":
- PVD coatings (Physical Vapor Deposition) are noticeably more scratch-resistant and fade-resistant than standard plating
- If you sell into humid or coastal markets (e.g. Latin America / equatorial regions), insist on the salt-spray report, not just "rust-proof" marketing
- A finish that won't survive a year kills distributor trust faster than any feature sells it
4. DIY Installation: Step-by-Step (clean, complete, and written for real humans)
⚠️ Stop here if you've never shut off a supply line before. Flooding a cabinet is expensive. Otherwise—read on.
What you'll typically need
Adjustable wrench, basin wrench (huge help), plumber's putty or silicone, flashlight, towel, bucket.
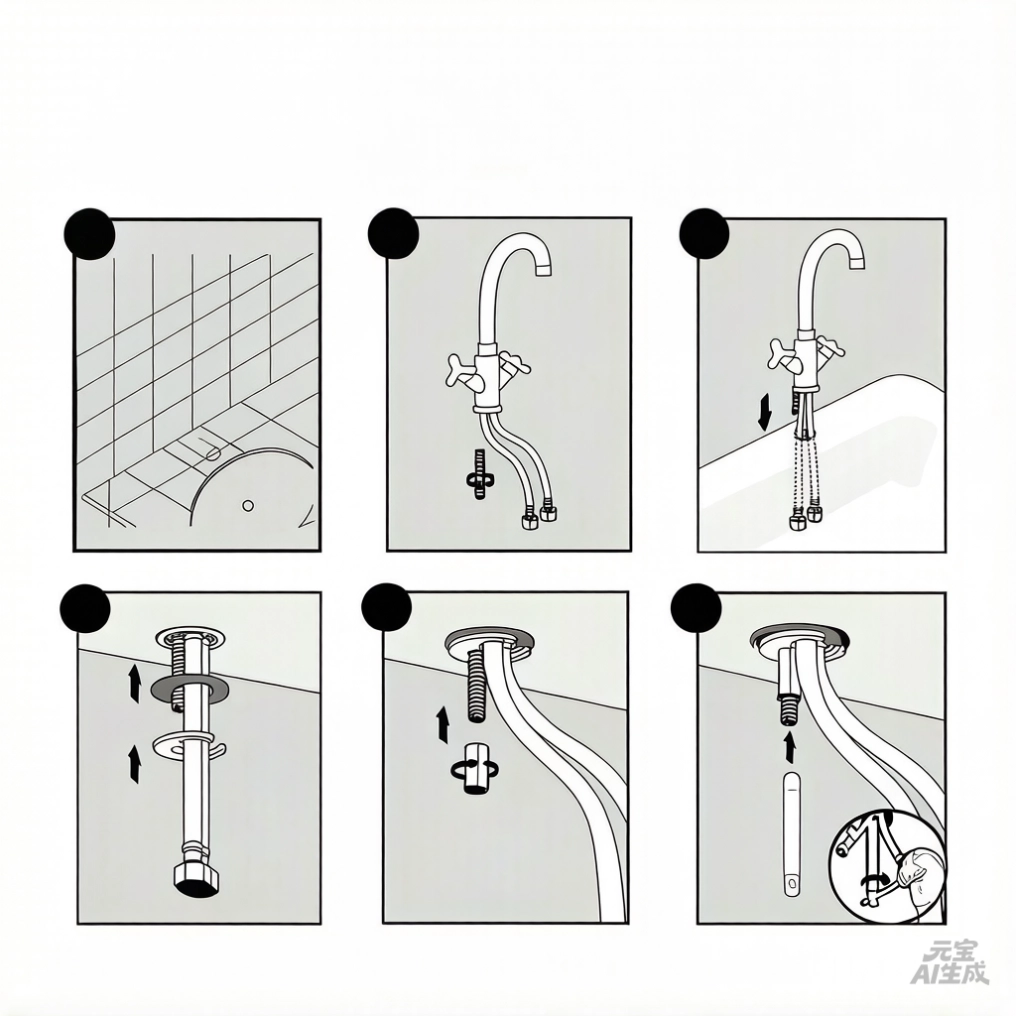
The Steps
Step 0 — Shut off water & relieve pressureClose the hot & cold angle valves under the sink. Open the faucet to drain. Put a bucket/towel under everything.
Step 1 — Remove the old faucetDisconnect supply lines. Unbolt the mounting nuts from below. Lift the old unit out. Scrape old putty/gasket residue flat off the deck.
Step 2 — Install the deck plate (if your new faucet uses one)Seat the plate with its gasket/putty so it sits flush. This is the moment to check alignment—once tightened, you don't want it crooked.
Step 3 — Feed the new faucet lines through the hole(s)Guide the supply tubes and pull-out hose (if any) up through the deck opening. Sit the faucet body down and hand-center it.
Step 4 — Secure from belowAdd the rubber washer → metal washer → mounting nut(s). Tighten evenly. Don't overtighten—you're sealing against porcelain/stainless, not torqueing a lug bolt.
Step 5 — Connect supplies & any weight (pull-out models)
- Attach hot/cold supply lines with proper thread seal (usually factory-included).
- Clip the weight ball onto the pull-out hose ~25–30 cm below the deck so the hose retracts cleanly.
- Route hoses so they won't kink against the back wall.
Step 6 — Slow open & leak testCrack the angle valves open slowly (air burps out). Check every connection: shank base, supply nuts, hose crimps. Tighten just enoughif you see seeping—never gorilla-it.
Typical DIY time: 45–90 minutes. If your shut-off valves themselves leak when turned, replace them before blaming the faucet.
5. Common mistakes that cause "the faucet is broken" (but it isn't)
Symptom | Likely Cause | Fix |
|---|---|---|
Drip from spout after closing | Cartridge worn / debris jammed | Flush lines, then replace cartridge (keep spares) |
Handle stiff / squeaky | Dry stem / hard-water buildup | Food-grade silicone grease, not WD-40 |
Pull-out head won't stay docked | Missing weight / hose snagged | Reposition weight, check docking ring |
Base wobbles | Uneven deck / missing shims | Re-seat with proper gasket/putty, re-torque evenly |
Black / gritty water at first use | Line sediment from shutoff/rework | Flush into bucket before final assembly |
6. For Distributors & Importers: How to turn this category into reorders
Kitchen faucets are a repeat-contact category—customers rarely buy just one and vanish. They buy one, see it daily, then upgrade the second property, or refer the contractor.To make that work for you:
- Standardize hose length & aerator tool size across your range (your installers will thank you)
- Keep cartridges and decorative caps as standing spare SKUs
- Offer a tiered bundle: Entry Chrome / Mid PVD Brush / Premium Matte Black — so retailers always have an upsell path
CTA
Need spec sheets, finish-test reports, or sample kits for our pull-out kitchen faucet range?[Contact Us / Request Catalog / WhatsApp +86 …]